Simple is Better: the Upgrade to Virtual Shifting
Indoor training just got a little more simple in our household with virtual shifting. It’s worth considering if virtual shifting would make your life more simple, too.
Backstory
My wife, Erin, and I have been sharing an indoor trainer for the better part of a decade. My role in our house is both the family bike mechanic and the remover of barriers to participation in exercise and sports. I never complained about swapping out the cassettes on our Wahoo Kickr(s) over the years. Erin’s cyclocross bike is 10 speed, and my road bike relegated to indoor use is 11 speed. I waxed both chains to keep the task as clean as possible, but it remained a chore nonetheless.
We recently upgraded to a Wahoo Kickr V6 and the Zwift Cog 2.0. Swapping our bikes on the trainer to ride on Zwift couldn’t be easier now, and Erin and I are adapting to the benefits that virtual shifting offers. I’ll detail them below for your consideration.
Drivetrain Compatibility
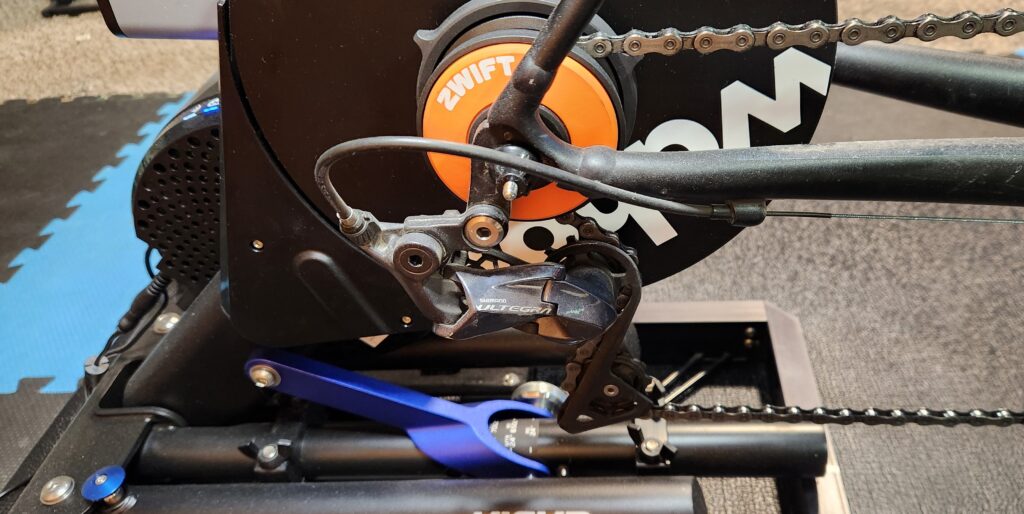
The most obvious benefit of upgrading to virtual shifting is drivetrain compatibility. The Zwift Cog can accommodate chains between 8 and 12 speeds, which covers most bikes on the market. This means I can swap my bike with Erin’s bike without having to remove the cassette. This is such a time saver and involves no tools. I won’t miss keeping track of and remembering to install the spacer for Erin’s 10-speed cassette.

No Derailleur Adjustment
I also won’t miss adjusting the derailleur for the cassettes on our Kickr. Invariably, the cassette spacing would be slightly different on the Kickr than our respective wheel sets, enough to throw the shifting off. It became a ritual, when moving our bikes indoors, to adjust our rear derailleurs for indoor riding. This involved a barrel adjustment on my mechanical derailleur to add or release cable tension. Erin is running first generation Shimano Di2 (yep, it’s still running flawlessly), and I annually have to find the same YouTube video for the micro adjustment instructions for her derailleur.
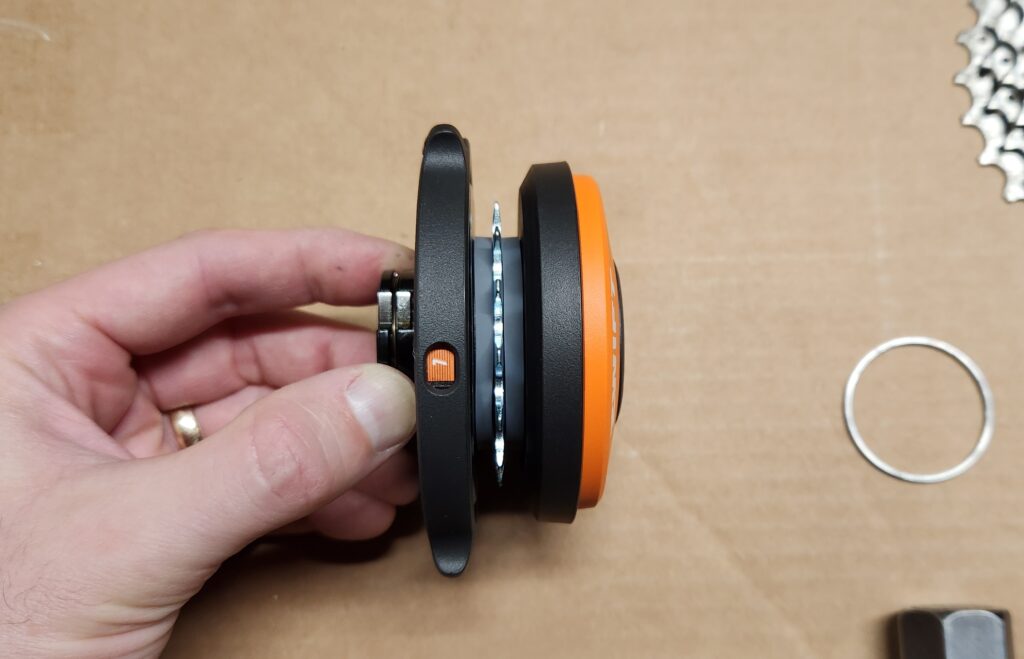
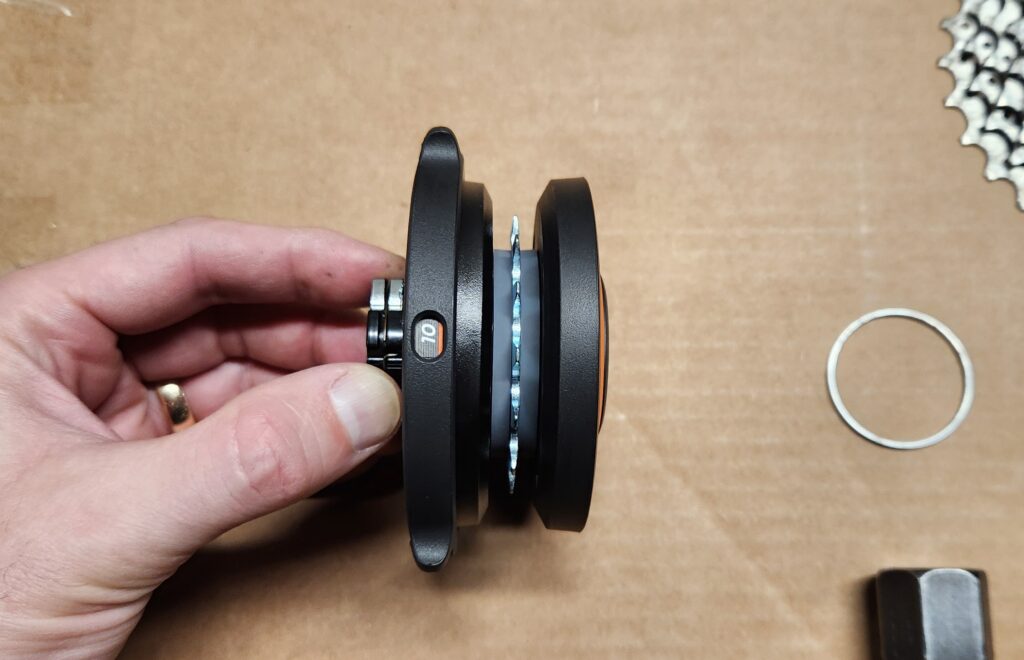
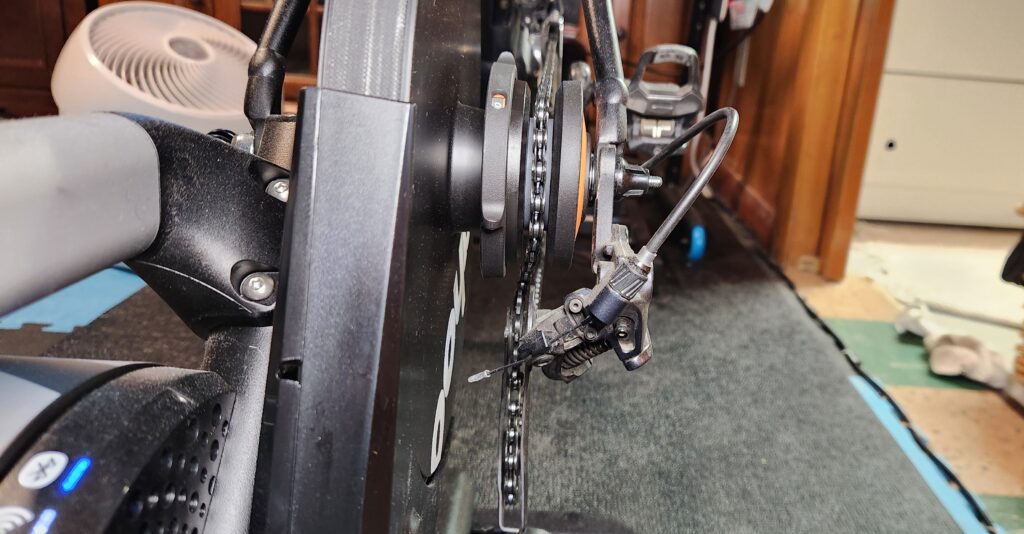
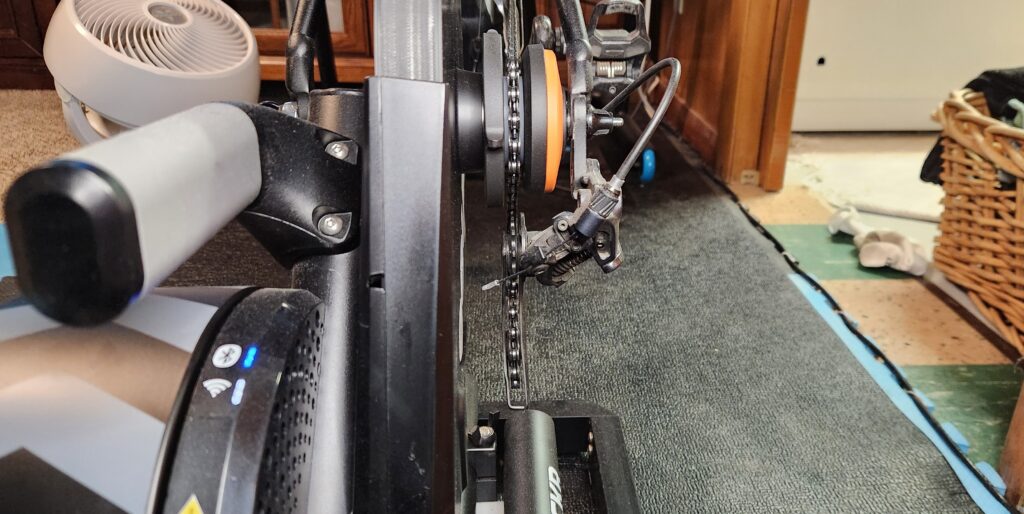
The newest iteration of the Zwift Cog includes an alignment feature. I would say that there is nothing special about the Zwift Cog and that you can accomplish almost the same with an inexpensive single speed conversion kit. However, that is only true for the first all-black iterations of the Zwift Cog. This new orange version includes a spring loaded adjustment that moves the position of the single cog. Below I show the extremes: position 1 and position 10. Adjusting the Zwift Cog is easily done when the bike is on the trainer by rotating the inner plastic ring clockwise. After position 10, it snaps back to position 1.
Optimal Chain Line
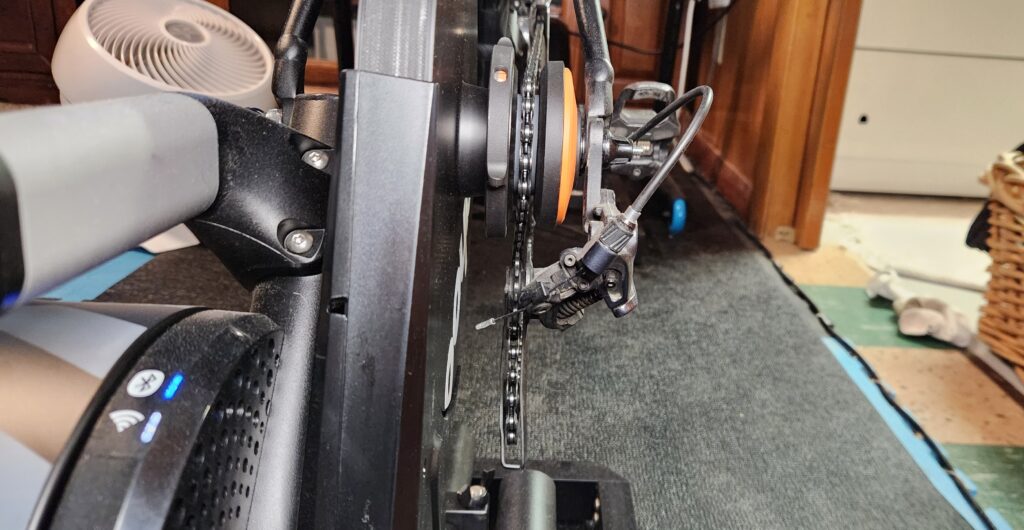
By adjusting the alignment of the Zwift Cog, you can achieve an optimal chain line. This will result in less wear and tear on your equipment and increased efficiency of your drivetrain. A straight chain is a fast chain. In the pictures below, I demonstrate a.) position number 1, which is all the way in, b.) position number 10, which is all the way out, and c.) position number 4, which is the optimal chain line for my bike. I didn’t have the exact same camera position each time, but the pictures give you a sense of what the extremes look like. The optimal chain line for Erin’s bike is position 5, so I click the Zwift Cog one more position when swapping her bike on the Kickr.
Shifting Under Load
Erin and our teenage boys are tired of hearing me exclaim on bike rides and at cyclocross races, “Don’t shift under load!” Over the years, I tried every possible way I could think of to get this principle across to them. Countless popped and dumped chains later, they anticipate it before I can get it out of my mouth. “I know, I know, I shouldn’t have shifted under load.”
So, you can imagine the cognitive dissonance when I now share with them that it’s ok to shift under load with virtual shifting. You can be wailing on the pedals in a full sprint, and there’s no chance that virtual shifting will make your chain skip or jump. This is accomplished both by the high tooth profile of the single cog and the fact that “shifting” is really the trainer changing the resistance.
I’ve tested this out in our local cycling club’s January sprint series on Zwift. The second hour of the ride is a points race with 5 or 6 sprints. My indoor sprint is fairly pedestrian under 1300 watts, so I need perfect timing and a power up to be competitive. Having the option to shift while sprinting without fear the gears will skip is certainly beneficial, but I wouldn’t say it’s a clear advantage over mechanical shifting. Rather, virtual shifting is more of a mental assurance that you are less likely to skip a chain when shifting during a sprint.
Shifting Without Pedaling
Another benefit to virtual shifting is being able shift without pedaling. If you ever stop and want to get restarted again, it can be difficult if you are in a high gear. I have witnessed Erin struggle with this because she doesn’t intuitively shift down before stopping (she will admit this – I’m not speaking out of school here). With virtual shifting, you can shift all the way down before even turning a pedal stroke. No more grinding gears to get going again.
Expanded Gearing
Virtual shifting eliminates the need to consider the bike’s gearing in relationship to the trainer difficulty setting on Zwift. We found that at 100% difficulty, our bikes were not geared low enough for comfortable riding on the steepest of climbs in Zwift. After a few years, we settled on 50% trainer difficulty, which worked well for both of our bikes. Erin’s cyclocross bike is geared 46/36 x 11-28, and my road bike is geared 53/39 x 11-28. Neither one of us had a 1:1 bailout gear on our indoor bikes.
The virtual gearing on Zwift is numbered 1 to 24, with gear 1 = 0.75 gear ratio and gear 24 = 5.59 gear ratio. To put this in perspective, Erin’s lowest gear, 36 x 28 = 1.39 gear ratio (virtual gear 6 on Zwift), and my highest gear, 53 x 11 = 4.82 gear ratio (virtual gear 22 on Zwift). That’s plenty of virtual gearing range to accommodate soft pedaling on the steepest of Zwift climbs and the most powerful of sprints (even at the max of 2200 watts on the Kickr, I highly doubt someone will spin out a 5.59 gear ratio (equivalent to a 56 x 10) on Zwift.
The virtual gearing increments mirror most cassettes. Gear ratio increments are: 1-5 (0.12), 6-8 (0.15), 9-12 (0.18), 13-16 (0.21), 17-20 (0.25), 21-23 (0.3), and the jump to gear 24 is a harsh 0.45. Those increments feel approximate to the ones on most cassettes. The Zwift Ride offers options for customizing the gearing and patterns of the virtual shifting.
Click and/or Play
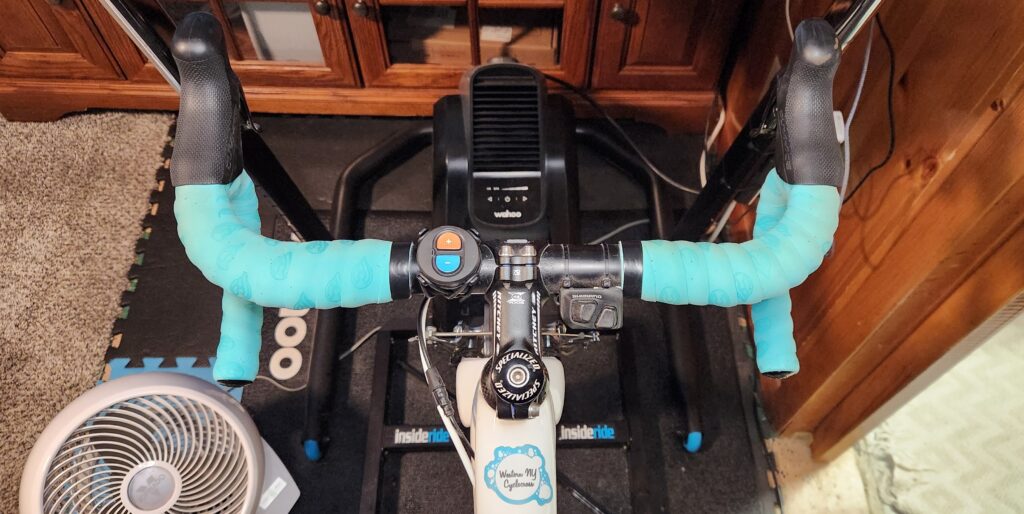
The virtual gears on Zwift can be controlled by both the Click and the Play controllers. The Click is included in the Zwift Cog Upgrade Package and sold separately. If you have enough connectivity capacity, the Click and the Play can be used together. The Click is handy because it can be moved around and mounted in different spots on the handlebars and elsewhere. The Play controllers are nice because the shifter controls are positioned on the outside where you would be shifting typically and they offer some haptic feedback to confirm that you have shifted gears. The right side increases the gears, and the left side decreases the gears on the Play controllers.
Erin runs the Click on the opposite side of her Di2 thumb shifters. She is used to push button shifting, so this isn’t a major change for her. However, she does need to remember to shift with the Click and not the Di2 shifters. Though, we have found that an occasional mis-shift of the rear derailleur is not catastrophic because the chain guards on the Zwift Cog prevent the chain from dropping off the single cog.
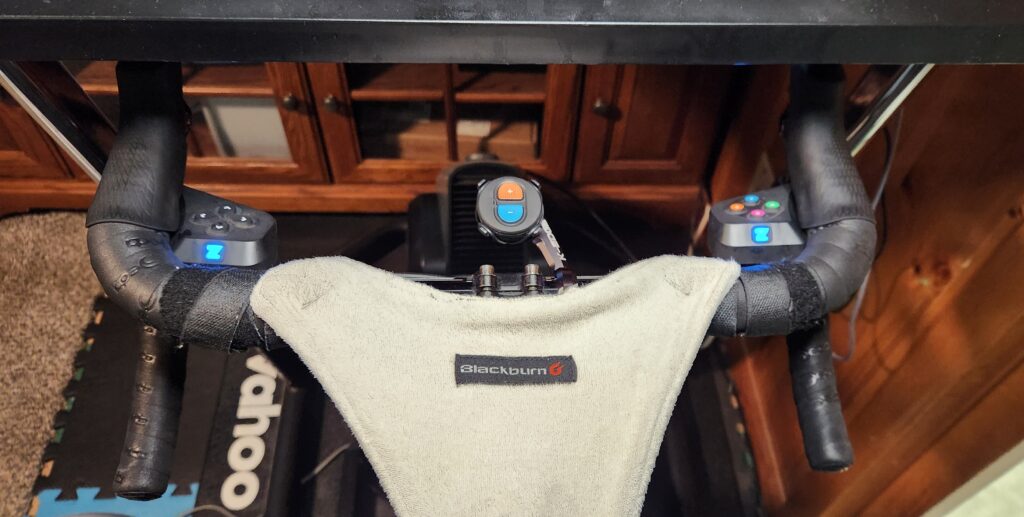
I have been running both the Click and the Play controllers. I use the Play controllers when I’m in the hoods, and the Click when I’m on the bar tops. As you can see in the picture, I mounted the click on my computer mount using the crossed rubber bands that are included.
Compatible Trainers
We were really hoping that Wahoo was going to make the earlier generations of Kickrs backward compatible for virtual shifting. However, Wahoo determined that it wasn’t possible to update the V5. So, that meant that if we wanted to move to virtual shifting on Zwift we would need a new V6 Kickr. Though that’s bad news for many long-time Wahooligans with older generation Kickrs, there is good news for owners of other trainer brands. The list of trainers sold with Zwift Cog & Click includes trainers from Elite, JetBlack, Van Rysel, and of course Wahoo. And, the list of trainers capable of firmware updates for Zwift virtual shifting has been incrementally increasing. The Zwift Cog & Click Upgrade Kit is sold both with and without a freehub, so check to see what you need for your trainer, if compatible with virtual shifting on Zwift. Unfortunately, there’s no price break for the no freehub version of the upgrade kit. Technically, you only need the Click to shift virtually on Zwift. There’s nothing to stop you from setting your chain in the middle of your cassette and using the Click to shift gears virtually.
Virtual Shifting on Other Platforms
Zwift is not the only indoor riding platform with virtual shifting. Indievelo that was recently acquired by TrainingPeaks has featured virtual shifting for as long as I can remember. No proprietary controllers are required on the renamed TrainingPeaks Virtual, and you can shift virtual gears using a keyboard. You may want to try virtual shifting free on Trainingpeaks Virtual through March 2025 before deciding if it’s worth upgrading your Zwift setup.
 Your Way To More Fun with Your Triathlon Training and Racing")


I just put the Zwift cog on my gen 3 kicker because I now run both shimano (TT) and SRAM (gravel) bikes on my trainer. I didn’t realize you could fine tune the cog with that adjustment barrel ……installation instructions are not the best. I will give it a try…thanks!